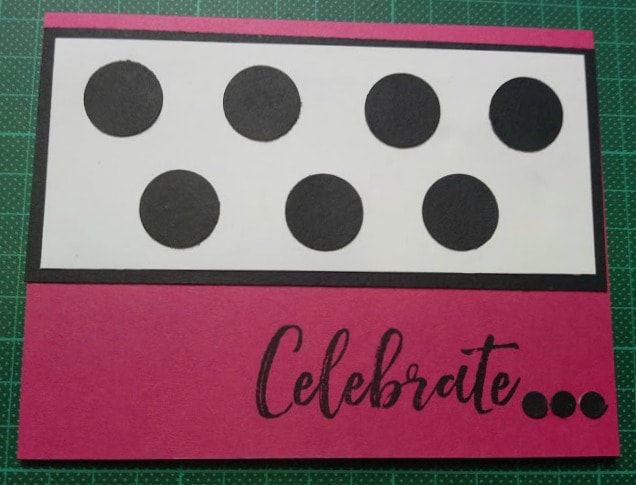
Four Cards in 10 Minutes!
Greeting cards - birthday, get well, sympathy, new baby, thank you and so on, are expensive. Even from the $2 shops these days they are, well over $2 each! It used to be you could get five cards for $2, then it was four for $2, then they were $1 each, and now you pay $2+ for a very simple, very boring cheap card.
You don't need a lot of special equipment to make cards, and you don't need a lot of fancy papers and stickers and other embellishments.
And best of all, you don't need a lot of time.
In just ten minutes, you can make four beautiful cards, for less than the price of one from a $2 shop. Best of all you can make them to suit the recipient by personalising the greeting, the colour, the embellishment.
To make these four gorgeous cards in under 10 minutes you will need:
Ruler
Scissors
4 coloured card blanks
(4) 5-1/4" x 2-1/4"" black cardstock
(4) 5-1/4" x 2" white cardstock
3/4" Circle punch
Small hole punch
Sentiment stamp
Ink pad
Adhesive
Step 1. Take the black cardstock and using the 3/4" circle punch, punch out 7 circles, leaving a narrow border. Punch 5 small dots from the remaining black cardstock.
Step 2. Stick the white cardstock to the black cardstock, being sure to hide the holes.
Step 3. Stick the black and white cardstock to the card base, leaving a narrow border at the top and sides.
Step 4. Lay out the black dots. When you are happy with the pattern, stick them down using tape runner or liquid glue.
Step 5. Stamp your sentiment to the bottom left corner of the card.
Step 6. Stick the small dots to the bottom right of the sentiment.
Repeat for the remaining three cards.
And there you are, you have four beautiful, handmade greeting cards, in 10 minutes for under $2!
Notes:
You can use whatever colur cardstock you like - i have used black and white because that's what i had and they went well with the hot pink card base.
Card bases: coloured card bases can be bought at $2 shops, usually in packs of 6 with matching envelopes for between $2.50 -$3.50 (it really depends on the $2 shop). Kmart sell a pack of 25 white card bases and envelopes for $3 a pack, making the card and envelope just 12 cents - a bargain price. They are a standard size so cost $1.20 to send.
Punches: my instructions say to use a 3/4" circle punch, but if you don't have one, don't stress. Find something about that size, trace around it and cut them out. You can get a single hole punch for $2.25 from Kmart, and it will be a very useful addition to your craft room and your card making tools.
Sentiments: if you don't have any stamps, find a nice font and create a sentiment in Word, print it and cut it out. You can mount it onto coloured cardstock to give it a bit of body, leaving a small border so that it becomes a part of the card design.
